Tuesday, 11 September 2012

Rainbow themed first birthday party

So Ava's first birthday has come and gone, and what better way to celebrate her first year of life by throwing a big birthday bash. The planning started a few months back when I was trying to think of a theme for the party. One year olds may not show too much interest in one specific theme so you can't go wrong with a colour theme to grab your child's attention. Since Ava cannot tell me what her favourite colour is, I thought rainbow colours would do just fine! So our rainbow coloured theme turned into a blow out of rainbow decorations (both home made and bought) as well as rainbow themed food, cake and loot bags for the children. We have lots of family and friends with children so we had about 50 people (including children) at our home for the party. Praying that the weather would be nice enough to use our backyard. I had a vision in my head of what I wanted for the decorations and by shopping around at the party stores I could not find what I needed to fulfil this vision. So I decided to make my own decorations. Below are some pictures of home made, very easy to make decorations.


Instructions:

Heart streamers- Cut 7 strips of construction paper; 2 long, 3 medium and 2 short. Lay them on a table in this order; long, medium, short, medium, short, medium, long. hold them all together in that order at the bottom. the middle medium piece is the piece you will hang it from. Fold the three strips that are on one side of the middle piece in to form a heart. Do the same thing with the other side. Either glue or staple the bottom so all the pieces are secure. thread fishing wire through the top of the middle strip to hang them.

Mega blocks are very easy to create letters and theymake a great centre piece for a table.

Birthday sign- using foam paper, cut out shapes and letters. Hot glue them together and thread together with ribbon.

Popsicle stick streamers- simple! coloured popsicle sticks glued (hot glue gun) to fishing wire, easy and looks great.

Giant Pom Poms-Take 5-6 large rectangles of tissue paper. Stack on top of one another and fold the long side back and forth to make a fan shape. Tie twine in the middle of the fan to break it in half. Once its tied, pull each individual piece of tissue paper towards the middle carefully. Continue to pull each piece on all sides until it creates a large pom pom.

Now that I have explained how to make some of my homemade decorations, I will share a few more ideas and pictures from ava's birthday party. Balloons are great decorations, but there are ways to make balloons look more creative.


Flower balloons- blow up 5 of the same colour same size balloons. Tie them all together. Blow up 2 other balloons the same colour but smaller than the first 5. Tie the smaller balloons, in the middle of each side to create a flower shape.

Balloon collage- Blow up and tie together 4 balloons of each colour. Thread twine with a needle through the knots of each colour bundle. Push each bundle together and hang the twine on each side.

Rainbow food galore! I wanted to bring the rainbow theme into the food that we were serving as well so we had a rainbow themed fruit platter, veggie platter, cupcakes, cake and rice krispy squares dipped in chocolate. the spread looked great!


I wanted to have a something that Ava could have when she is older as a keepsake from her first birthday. I created a signing board of a collage of  black and white pictures from Ava's first year of life. The pictures were glued onto a large board and arranged in the shape of a large 1.  Everyone at the party had a great time looking at the pictures, signing the board and writing messages that Ava will read when she is older.

Loot bag time!!! I thought it would be nice to pesonalize loot bags for each child that would be aattending the party. So there were two parts to the loot bags. The first part was a pail with the child's name on it, filled with goodies, like books, balls, bath toys, cars, and treats. The second part was that I created a personalized picture frame for each child with their name on it. Inside the frame I put a picture of that child and Ava together. It was a great hit at the party and the children loved having something they could take home to hang on their wall. Some examples below:


Last but not least after this long blog, a great way to entertain children at a party with music, dancing, parachute games, tatoos, balloon animals and a giant, fury Elmo!!! The children had a blast!


Hope you enjoyed! Until next time :)


Thursday, 6 September 2012

My Crafty Creations

With 6 children born into my immediate family in the last 3 years and friends that have begun to have babies, I find myself thinking about new things I can create for them. Something personal, something crafty and something that either interests the child or goes with the decor of their rooms. I purchase most of my materials at Michaels art store seeing how good the quality of their products are. Being on maternity leave, although you are home with your child, doesnt mean that you have much time during the day to do things that interest you. Especially having a child like Ava who's longest nap has probably been 30 minutes since the day she was born. She is so busy and always on the go, she takes short naps so she doesnt miss anything, (cause walking the mall is so exciting!!) Where was I going with this?....oh ya, because of the short naps, after picking up all the toys, cleaning the dishes and very dirty high chair, throwing the laundry in and letting the dog out, I get about 6-8 minutes a day to sit relax and work on some crafts for the children. Below are pictures of a few of the crafts I have created.
 
My best friend Shawna had a beautiful baby girl Grace. I just had to create her name using the colours of her room and decor. Instead of hanging them with nails, ribbon adds a more elegant touch.

A picture for my niece Brooke to hang in her room of her new home to personalize it and make it her own.

A choo-choo train for my 2 year old nephew. It hangs over his dresser and every morning he spells out the letters of his name and says "Evan's choo-choo train".

A nice reminder of your babies birthday, and all the little tid bits of information that goes along with the birth of a new baby.


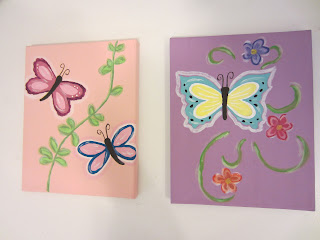
                                          Butterflies for my 3 year old niece by her request.

Wednesday, 5 September 2012

Nursery Decor

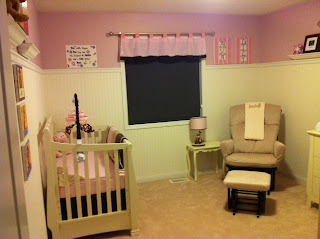
The day Ava was born was the happiest day of my life. Although adjusting to the challenges of having a new born was tough, it was all worth it and I would do over many times again. I always had a knack for decorating and creating my own crafty decor, so being able to design and create Ava's nursery was so exciting and fun. There are so many stores and websites where you can order decals and decor for nurseries but I wanted to put mommys touch in her room. I have posted below pictures of Ava's nursery and a few of the inexpensive crafts that I was able to do to add color and charm to her room.
Looks like wainscotting but is actually textured wallpapaer. Very easy to put up and looks great.

My husband installed a chair rail around the room, which adds a nice divider between the wallpaper and paint. Bought at local hardware store, also very easy to install with wood nails.

A nursery looks great when completed with a colour decor/theme and a nice bedding set that could be purchased at local baby stores

Flat canvases from Michaels (art store) are my favourite to use when creating an art piece for the decor of a room. I chose a cute poem and used scrapbooking letters and stickers to create this cute piece of art for the wall.

Flat canvases are also great to paint with acrylic or oil paints, (if you dont want to spend a lot of money, paints can be purchased at dollar store). Depending on your theme, simple stripes and circles add to a design. I like these name canvases because they are different then just buying wooden letters from a store. I freehanded the letters but you can always use a simple letter stencil.

Growing up with two older sisters, there are many babies popping up in our family. I have done many pieces for friends and family to add to their childrens rooms which i will post shortly. My oldest sister just had twins (boy and girl) and we are in the process of decorating and setting up the nursery. I will definitely be posting those pictures when it is all complete.


My inspiration

Ava Lily, my beautiful almost one year old daughter has inspired me to create this blog so I can share a variety of fun ideas and information to other mothers out there. These mothers may be Moms to be, first time moms, or "experienced" moms of multiple children. This blog is also for other moms to share their experiences, ideas and thoughts because being a first time mother, I have many questions myself which I would love input on. As a child growing up in a household filled with only women, (myself being the youngest) there was a lot of playing house, pretending to be mommys to our many, MANY baby dolls, and learning what it is like to take care of others at such a young age. I just knew that I am a natural caregiver and need to have a large family of my own. Not only did I want many children, but I also knew that as a profession, I needed to do something where I can use my care taking and creative skills to its fullest. So after high school I went on to accept a degree in early childhood education as well as a degree in education. From then on, whether professional or personal,  my dreams of teaching children to their fullest potential had begun.